
Copy-paste workflow
After installation, drop files anywhere on the large data partition. Ventoy scans folders recursively and lists images in the boot menu (alphabetically by default).
Multiboot USB
Ventoy formats your drive once, then you simply copy ISO, WIM, IMG, or VHD(X) files. At boot, pick the image you need—ideal for IT support, dual-boot labs, rescue kits, OS installers, Secure Boot troubleshooting, and step-by-step multiboot USB setup.
Ventoy is an open-source project by longpanda. This page is an independent English guide; always verify checksums when you download releases.
These points summarize how Ventoy differs from “one ISO per USB” tools. They reflect common multiboot, UEFI, and large-file workflows so readers can find what they need quickly.
After installation, drop files anywhere on the large data partition. Ventoy scans folders recursively and lists images in the boot menu (alphabetically by default).
Secure Boot is supported in recent releases; follow the secure boot and keying guidance for your firmware when enabling it.
The main partition often ships as exFAT; you can reformat to FAT32, NTFS, UDF, XFS, or ext2/3/4 if cluster size rules are respected—handy for very large installers or Linux-native workflows.
Advanced users customize menus with ventoy.json, persistence, injection scripts, and other plugin features documented in project materials.
Updating Ventoy on the stick is designed to keep your ISO library intact—re-run the installer/updater when a new version ships.
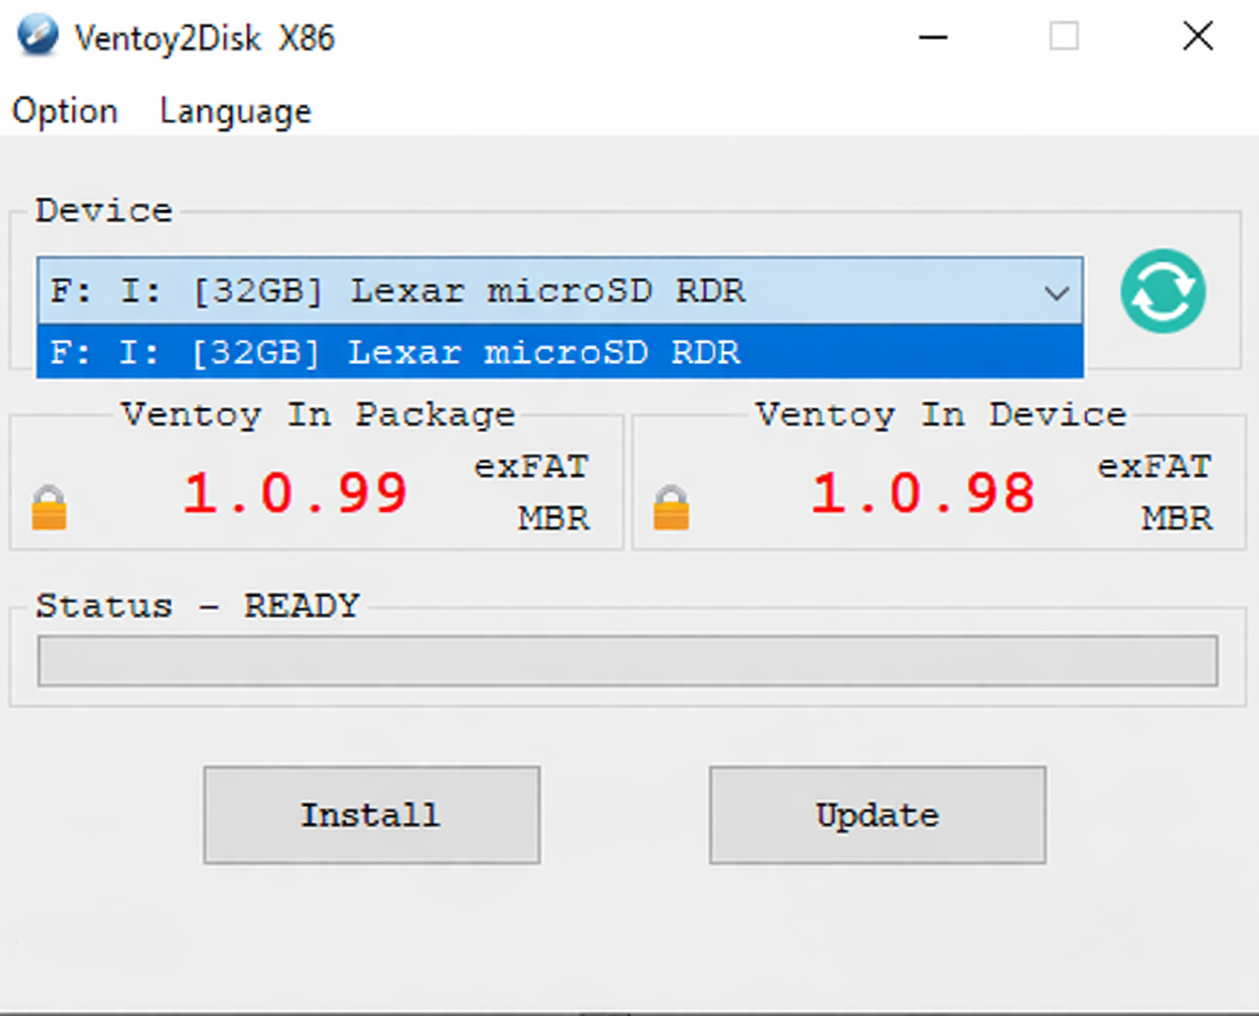
Windows users run Ventoy2Disk.exe (with optional ARM/ARM64/X64 variants). Linux users can use shell scripts, GTK/Qt GUIs, or the WebUI—pick what fits your environment.
This is a condensed checklist you can follow on Windows or Linux before you copy your first ISO.
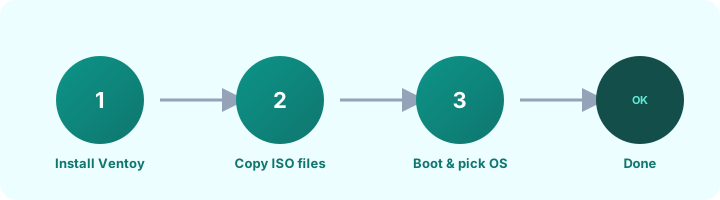
Download the package for your OS, extract it, and run the installer against the correct removable disk. On Windows, if the device list is empty, toggle “Show all devices” only when you know exactly which disk is safe to wipe.
Warning: Installation formats the target—backup data first.
Use the large partition and copy ISO/WIM/IMG/VHD(X) files into any folder structure you like. Ventoy discovers them automatically; very large libraries may increase scan time (see search path docs).
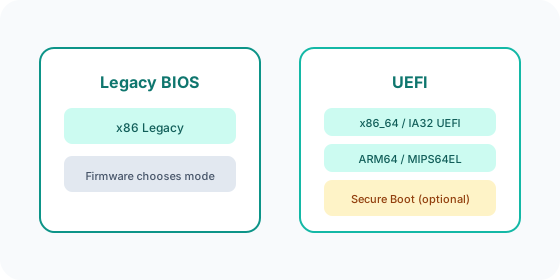
Choose the USB boot device in firmware. On the Ventoy menu, the lower-left corner shows the active mode (for example Legacy BIOS vs UEFI). Pick the image you need and continue troubleshooting only if boot fails.
Ventoy does not “force” Legacy vs UEFI—your motherboard firmware decides. If Secure Boot errors appear, update Ventoy, follow secure boot documentation, and confirm the ISO itself supports your mode.
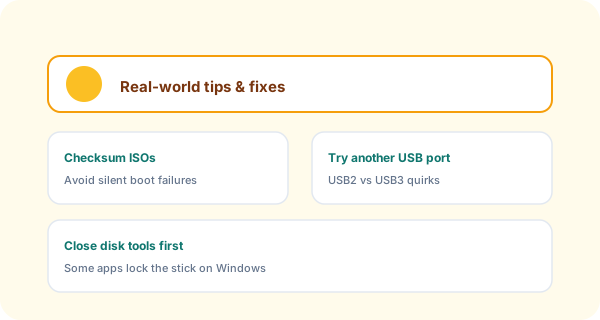
The following patterns are distilled from common forum threads and IT bench notes. They are not personal testimonials; treat them as practical checks that often save time when something “should work but doesn’t.”
Technicians often keep one “master” Ventoy drive with current Linux live images, firmware update ISOs, and a hardware diagnostic stick image. Naming folders by semester or project (/2025-fall) keeps menus readable when dozens of files coexist.
Many users pair a Windows installer ISO with a Linux live environment for rescue. If a PC boots UEFI for one image but not another, verify the image supports UEFI, disable fast boot temporarily, and try both USB 2.0 and 3.0 ports when oddities appear.
Compare the SHA-256 hash with the value published next to that release. If a port does not enumerate the USB, try USB 2.0, a different rear motherboard port, and a one-time boot menu key before you assume the image is bad.
Use this section as a structured checklist. Each item maps to recurring themes people hit in support threads—dig into screenshots and release notes when you need deeper steps.
Close disk utilities and drivers that mount ext partitions or virtualize disks (examples often cited include Paragon, Dokan, ext2fsd, DiskGenius, and some Intel DSA components). Then reconnect the stick and retry.
Performance can depend on USB port generation and controller quirks. If speeds collapse, test another port, avoid flaky extension cables, and rule out counterfeit flash hardware.
Confirm the file fully copied (not stuck in the Recycle Bin), meets supported types, and lives on the data partition—not the small EFI reserved area. Use .ventoyignore only when you intentionally hide folders.
Verify ISO checksums, try a known-good image, and review legacy BIOS disk access limits if hardware is older. A damaged VTOYEFI partition may require recovery steps documented under non-destructive install notes.
For edge cases, search issue trackers and community threads for your exact error text and hardware model.
Short answers below; expand for detail.
.ventoyignore file inside any directory you want Ventoy to skip. Subfolders under that path are ignored as well, which keeps backup or private data out of the boot list.
ventoy directory on the large ISO partition and store ventoy/ventoy.json there. Do not place it on the small reserved EFI partition.
The sections below are additional material—long-form notes, scenarios, and terminology that complement the overview above. Skim the index, then jump to what matches your hardware or workflow.
After installation, a typical stick exposes a small EFI-related region reserved for boot firmware and a large data region where you store ISOs and other files. Treat the data region as your working library: it is the surface you interact with daily in the file manager. The reserved region is not where you should drop random ISOs—doing so will not list them in the menu and may confuse recovery tools.
When you reformat the data partition (for example to NTFS or ext4), you may need to remember the cluster size rule for Ventoy: too small a cluster can cause compatibility issues. If you are unsure, stick with the default exFAT layout first, then experiment on a spare stick before rolling changes to a production key.
| Region | Typical role | User action |
|---|---|---|
| Reserved / EFI | Boot chain, firmware-visible files | Do not use for ISO storage |
| Data (large) | ISO/WIM/IMG/VHD(X) library | Copy files freely; organize folders |
On Windows, elevation matters: running the installer with least privilege may hide devices. If the UI still refuses to enumerate a stick, remove competing software that installs virtual filesystem drivers. Hibernate and fast startup can leave file handles open—fully shut down or use “Restart” before imaging.
Linux users often prefer the shell script path. Always double-check device nodes with lsblk or ls -l /dev/disk/by-id before passing /dev/sdX to an installer. Never guess a partition number when the whole disk is intended.
When you later mount the data partition on Linux to copy files, you may need to install userspace exFAT/NTFS support depending on your distro. If you reformat to ext4, remember that Windows machines may not read that partition without extra drivers—plan cross‑OS workflows accordingly.
Modern PCs often ship with UEFI-first boot and optional CSM (Legacy) support. If you boot the same stick twice and see different behavior, you may have toggled between firmware menus or the firmware picked a different boot entry. Some machines expose two boot entries for the same USB device—one UEFI, one Legacy—choose the one that matches your image.
Secure Boot is a policy decision: enabling it requires that your firmware trusts the Ventoy boot chain and that the payload you launch is compatible. When in doubt, disable Secure Boot temporarily for diagnosis only, then re-enable once you understand the failure mode.
Organizations often standardize a single multiboot stick with a pinned set of ISOs and a documented checksum list. Change control: when you update Ventoy, record the version string and the device serial of the stick you updated. For labs, label the USB with a durable tag and store a photo of the menu in your knowledge base so new staff can verify expected behavior.
If you must comply with data‑loss prevention (DLP) rules, avoid copying proprietary ISOs onto personal sticks without a ticket. Use read‑only media when you only need to boot without writing files back to the stick.
| Situation | Typical pitfall | Mitigation |
|---|---|---|
| New laptop, only UEFI | Legacy-only ISO | Use UEFI-capable image or enable CSM if available |
| Old desktop, BIOS only | Boot entry missing | Check USB boot priority; try another port |
| Secure Boot on | Key enrollment errors | Update Ventoy; follow firmware guidance |
| Large ISO library | Slow boot scan | Limit search paths; prune folders |
Treat every ISO like a binary artifact: verify checksums against a publisher you trust. Prefer downloads from project mirrors or GitHub release assets attached to the release you intend to install. If a signature or checksum fails, do not boot the image—re-download on a clean network path.
When lending a stick to others, assume it has left your trust boundary: wipe it or reformat before returning to sensitive environments. Malware can reside in user data on the partition as easily as on any removable drive.
Single‑ISO tools rewrite the stick each time you flash a new image. Multiboot USB keeps the data partition and swaps files instead of re-imaging the whole disk. That tradeoff favors speed and flexibility when you maintain many ISOs; it also means you must manage disk hygiene yourself (checksums, folder layout, and firmware quirks).
Neither approach is universally “better”—choose based on whether you need a disposable, one‑shot installer or a reusable toolbox you carry between machines.
USB 2.0 ports are adequate for many Linux installers but painfully slow for multi‑gigabyte images. USB 3.x ports vary widely: controller firmware, cable quality, and thermal throttling on small sticks all cap sustained writes. When you copy a 5 GiB ISO, expect the first minutes to feel fast and the tail to slow as flash heats up.
If you benchmark sticks, use the same file size and filesystem each time. Remember: random I/O on cheap drives collapses faster than sequential copies—your boot experience depends on both.
Testing Ventoy in a VM is useful but not identical to bare metal. USB passthrough may expose different firmware paths; some hypervisors emulate optical drives instead of raw USB. If a VM boots but hardware fails, trust the hardware test first.
Ventoy installation targets removable media by default on Windows; still, mistakes happen when “show all devices” is enabled. Before any destructive action, photograph the disk layout in Disk Management or lsblk and confirm the serial number matches your intent.
Adopt a prefix convention: [priority]-[vendor]-[version]-[short-desc].iso. Priorities help humans during incidents; machines still sort alphabetically. Rotate retired ISOs into an /archive folder with a .ventoyignore if you want old files off the boot list without deleting them.
An empty menu usually means files are on the wrong partition, the filesystem is unreadable, or filenames are in a path you excluded. Mount the data partition on a working OS and confirm visibility. If you see files but Ventoy does not, check supported extensions and hidden attributes.
Encrypted archives on the same partition as ISOs do not affect booting unless you need them extracted at boot time. Keep personal documents on a separate encrypted volume if regulations require—do not mix sensitive HR data with public ISO libraries on shared sticks.
On small screens, long filenames truncate. Use a short label at the start of each filename. High‑contrast themes in the Ventoy menu help in bright server rooms—some themes are community‑provided; test them before you rely on them in production.
If power fails mid‑copy, assume the ISO is corrupt. Delete the partial file and re‑copy after verifying free space. Journaling filesystems reduce risk, but installers do not magically repair half‑written ISOs.
Publish a CSV of expected hashes per quarter. Rotate ISOs with a ticket; never accept “random USB from the drawer” without a recorded checksum. Automation can verify hashes nightly on shared storage.
Additional answers—same accordion pattern as the FAQ above. Content is independent and covers edge cases readers often search for.
01-rescue before 02-install). Show them the firmware boot menu once, then the Ventoy menu so they understand the two-stage choice.vendor/version/purpose patterns. Avoid spaces if you script across shells; hyphens are universally safe.This block adds more standalone material: runbooks you can print, symptom tables, and another accordion set. It does not repeat the short FAQ above—it extends into operations and rare edge cases.
| What you see | Often means | Try next |
|---|---|---|
| Black screen after selection | GPU init or framebuffer issue | Boot with nomodeset-style kernel flags if the distro supports it; try another ISO build. |
| Instant reboot loop | Incompatible payload or corrupt file | Verify checksum; test a minimal live ISO. |
| “No bootable device” | Wrong firmware entry or dead port | Pick the alternate USB boot line; change port; disable fast boot. |
| Menu lists file but boot errors | Incomplete download or wrong arch | Re-download; confirm 64‑bit vs 32‑bit vs ARM. |
Keep a laminated card with your standard ISO set and expected menu order. When a customer machine fails, swap to your known‑good stick first—eliminates “bad USB” before you debug their hardware.
Rotate sticks between classes: sanitize or reflash between terms if students copied unknown files. Consider color‑coded stickers per curriculum track.
Store ISOs on network storage and sync to Ventoy sticks with scripted copies. Hash on both sides; abort the job if a mismatch appears mid‑transfer.
Manufacturers rename the same concepts: “Fast startup,” “Modern standby,” “USB boot,” and “Secure Boot” interact. Disabling fast startup on Windows can release locks on USB controllers. Some laptops hide USB boot unless “USB boot” is explicitly enabled in a hidden advanced tab—search your model’s service manual PDF for the exact wording.
BitLocker and device encryption on internal disks do not protect the Ventoy stick unless you encrypt the data partition separately. If you carry customer data, use OS‑level encryption on a dedicated partition or a separate encrypted container—not a substitute for policy, but better than plaintext.
Many live ISOs bring up DHCP automatically; corporate networks may require 802.1X or static VLAN assignment. If you need offline installs, prefetch packages onto the Ventoy data partition in a format your target OS can consume—plan ahead because not every installer supports arbitrary offline repos from USB.
Third accordion batch—topics skew toward power users and fleet operators.
Get the latest package from the official Ventoy website, verify checksums when possible, and read the release notes before updating production sticks.
Verify downloads using the published checksums (e.g. SHA256) before you flash production sticks.